本文:我遇到的WPF的坑
标记方法被使用
使用 UsedImplicitly 特性可以标记一个没有被引用的方法为反射使用,这时就不会被优化删除。
public class Foo{    [UsedImplicitly]    public Foo()    {        //反射调用    }
    public Foo(string str)    {        //被引用    }}
拼接 URI 路径
我需要将一个 URI 和另一个 URI 拼接如 https://blog.lindexi.com/post/123 和 /api/12 拼接,拿到绝对路径 https://blog.lindexi.com/api/12 可以使用下面方法
var uri1 = new Uri("https://blog.lindexi.com/post/123");var uri2 = "/api/12";
    if (Uri.TryCreate(uri1, uri2, out var absoluteUrl))    {        // 拼接成功,在这里就可以使用 absoluteUrl 拼接后的绝对路径    }
拼接 URL 参数
            var uriBuilder = new UriBuilder(new Uri("http://blog.lindexi.com"));            NameValueCollection query = HttpUtility.ParseQueryString(uriBuilder.Query);            query["Foo"] = "123";            query["doubi"] = "doubi";            uriBuilder.Query = query.ToString();
Console.WriteLine(uriBuilder.Uri);上面代码放在github欢迎小伙伴访问
C#代码如何获取 Pack URI 资源
在 WPF 里面,可以使用 Pack URI 格式的资源路径,格式如下
pack://application:,,,/ResourceFile.xaml
pack://application:,,,/Subfolder/ResourceFile.xaml
pack://application:,,,/ReferencedAssembly;component/ResourceFile.xaml
pack://application:,,,/ReferencedAssembly;v1.0.0.1;component/ResourceFile.xaml
对于 XAML 代码来说,可以支持相对路径,也就是如 ../ResourceFile.xaml 的路径。但是 C# 代码使用需要绝对路径,或者是从根路径开始的相对路径
获取资源时,需要区分是 Resources 资源还是 Content 资源
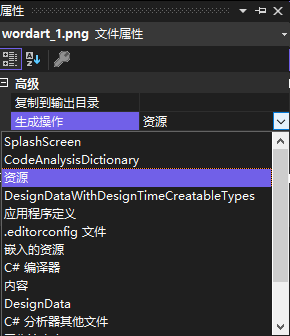
一个资源属于 Resources 资源还是 Content 资源取决于资源的生成方式。可以在项目里面,右击某个资源文件,点击属性,看他的生成操作是什么。如果生成操作是资源就是资源,生成操作是内容就是内容
或者是在 csproj 里面,看这一项是资源还是内容,如以下代码,这就是内容。其中内容需要设置 PreserveNewest 如果较新则复制内容,否则运行将会找不到内容文件
<ItemGroup> <Content Include="Content.jpg"> <CopyToOutputDirectory>PreserveNewest</CopyToOutputDirectory> </Content> </ItemGroup>如以下代码就是资源
<ItemGroup> <Resource Include="Resources.jpg" /> </ItemGroup>相同的一个文件,可以同时是资源也是内容,只需要在 csproj 将 Content 和 Resource 都写一次,使用相同的文件即可
获取资源时,需要使用 Application.GetResourceStream 方法获取,传入的就是 Uri 内容,代码大概如下
var streamResourceInfo = Application.GetResourceStream(new Uri("pack://application:,,,/ResourceFile.xaml"))这里获取到的 StreamResourceInfo 里面的 Stream 是不需要手动调用 Dispose 释放的,这是由 WPF 框架管理的
获取内容时,需要使用 Application.GetContentStream 方法获取,代码和上面差不多
var streamResourceInfo = Application.GetContentStream(new Uri("pack://application:,,,/ResourceFile.xaml"))但很多时候,在 C# 代码里面,直接获取本地的文件即可,不需要使用 GetContentStream 方法
参考文档:
Pack URIs - WPF .NET Framework Microsoft Learn
Application Resource, Content, and Data Files - WPF .NET Framework Microsoft Learn
Application.GetResourceStream(Uri) Method (System.Windows) Microsoft Learn
判断字符是数字或英文字符
判断字符是 0-9 的数字或 A-Z 或 a-z 英文字符方法
static bool IsAsciiLetterOrDigit(char character) => ((((uint) (character - 'A')) & ~0x20) < 26) || (((uint) (character - '0')) < 10);以上代码的 ((uint) (character - '0')) 的意思是在一个字符比 ‘0’ 小的时候,自然减去的值是负数,而使用 uint 强行转换,可以转出一个非常大的数字,自然就大于 10 的值。如果一个字符大于 ‘9’ 那么自然减去 ‘0’ 也大于 10 的值
而 ((uint) (character - 'A')) 的原理也和上面的数字相同。只是加上 & ~0x20 进行忽略大小写差别而已,为什么加上这个能忽略大小写差别?原因是 Ascii 设计的时候如此,在 Ascii 编码里,大写字符在前(数值较小)而小写在后,对应的大小写字符,相差在于 1 << 5 的位值上,例如 ‘A’ 和 ‘a’ 的值分别如下
- ‘A’ 65 0B1000001
- ‘a’ 97 0B1100001
也就是大写和小写的字符是从右往左数第6位(从1开始)相差一个位,刚好 0B100000 也就是取只有第6位(从1开始)就是十进制的 32 或十六进制的 0x20 的值。于是取 ~0x20 表示一个数值上,只有第6位(从1开始)是 0 的值,其他都是 1 的数值。对此取与,即可实现忽略当前数值的第6位(从1开始)的值
相当于想要让某个字符,此字符已知落在 A-Z 或 a-z 范围内,强行变为小写,可以使用 |0x20 的方式,强行将第6位(从1开始)的值改为1的值,如 (char)('A'|0x20) 将输出 ‘a’ 字符。反过来,将小写转换为大写,可以使用 &~0x20 的方式,强行将第6位(从1开始)的值改为0的值,如 (char)('a'&~0x20) 将输出 ‘A’ 字符
于是根据此编码方式,即可通过 ((((uint) (character - 'A')) & ~0x20) < 26) 判断出字符是否在 A-Z 或 a-z 范围
以上代码放在 github 欢迎访问
将 int 输出为二进制字符串
使用 System.Convert 进行转换
Convert.ToString(value, 2)当鼠标滑过一个被禁用的元素时,让ToolTip 显示
设置ToolTipService.ShowOnDisabled为 true
<Button ToolTipService.ShowOnDisabled="True">获取设备屏幕数量
通过 WinForms 方法获取
System.Windows.Forms.Screen.AllScreens上面就可以拿到所有的屏幕,通过 Count 方法就可以知道有多少屏幕
var screenCount = Screen.AllScreens.Length;获取当前域用户
在 WPF 找到当前登陆的用户使用下面代码
using System.Security.Principal;
// 其他代码
            WindowsIdentity windowsIdentity = WindowsIdentity.GetCurrent();            string crentUserAd = windowsIdentity.Name;
输出 crentUserAd 可以看到 设备\\用户 的格式
绑定资源文件里面的资源
在 WPF 的 xaml 可以通过 x:Static 绑定资源,但是要求资源文件里面的对应资源设置访问为公开
如果没有设置那么将会在 xaml 运行的时候提示
System.Windows.Markup.XamlParseException
在 System.Windows.Markup.StaticExtension 上提供值xxx
此时在设计器里面是可以看到绑定成功,只是在运行的时候提示找不到,展开可以看到下面提示
无法将 xx.Properties.Resources.xx StaticExtension 值解析为枚举、静态字段或静态属性解决方法是在 Resource.resx 里面的访问权限从 internal 修改为 public 就可以
资源字典引用
<Application.Resources> <ResourceDictionary> <ResourceDictionary.MergedDictionaries> <ResourceDictionary Source="pack://application:,,,/JeenalerenenearWerjilakaw;component/ColorBrushResourcesDictionary.xaml"></ResourceDictionary> </ResourceDictionary.MergedDictionaries> </ResourceDictionary> </Application.Resources>设计器会给你挖的一个坑是 component 如果写两次,如 ;component;component 那么设计器依然能帮你找到资源,但是运行就炸了
判断 WPF 程序使用管理员权限运行
引用命名空间,复制下面代码,然后调用 IsAdministrator 方法,如果返回 true 就是使用管理员权限运行
using System.Security.Principal;
        public static bool IsAdministrator()        {            WindowsIdentity current = WindowsIdentity.GetCurrent();            WindowsPrincipal windowsPrincipal = new WindowsPrincipal(current);            //WindowsBuiltInRole可以枚举出很多权限,例如系统用户、User、Guest等等            return windowsPrincipal.IsInRole(WindowsBuiltInRole.Administrator);        }
C# 判断软件是否是管理员权限运行 - 除却猩猩不是猿 - CSDN博客
注册全局事件
如果需要注册一个类型的全局事件,如拿到 TextBox 的全局输入,那么可以使用下面代码
EventManager.RegisterClassHandler(typeof(TextBox), TextBox.KeyDownEvent, new RoutedEventHandler(方法));高版本的 WPF 引用低版本类库导致无法启动
如果在一个 .net 4.0 的 WPF 程序引用一个 .net 2.0 的库,那么就会让程序无法运行,解决方法添加useLegacyV2RuntimeActivationPolicy
打开 app.config 添加 useLegacyV2RuntimeActivationPolicy="true" 在 startup 元素
下面是 app.config 代码
<?xml version="1.0" encoding="utf-8"?><configuration><startup useLegacyV2RuntimeActivationPolicy="true"> <supportedRuntime version="v4.0" sku=".NETFramework,Version=v4.0"/></startup></configuration>参见:WPF 软件引用其他类库启动无反应问题 - 灰色年华 - CSDN博客
非托管使用托管委托
如果有一个 C++ 写的dll,他需要一个函数指针,在C#使用,就可以传入委托。
那么简单的方法是这样写:
private static void Func(){} public void C() { c(Func); }其中c就是C++写的函数,传进去看起来好像正常。
但是有时候程序不知道怎么就炸了。
因为这样写是不对的。
传入的不是函数地址,传入的是把函数隐式转换委托,然后转换的委托是局部变量,会被gc,所以在C++拿到的是一个被回收的委托,调用时就会炸。
这里无法用catch,所以用这个会让程序退出。
调用C#的函数,使用委托,是隐式转换,上面代码可以写成下面的
private static void Func(){} public void C() { var temp = new delegate(){ Func }; c(temp); }于是在函数完就把temp放到gc在调用时找不到委托。
一个好的做法
private static void Func(){} private delegate Temp { get; } = new delegate(){Func}; private void C() { c(Temp); }放在静态变量不会gc调用不会空,可以这样不会出现上面问题。
元素失去获得
元素可以使用 CaptureMouse 方法获得,这可以用在拖动,一旦拖动出元素可以获得,得到拖动结束。
但是有时会失去获得,如果自己需要失去,可以使用 Mouse.Capture(null) 但是在没有自己使用的这个函数,失去获得,可以的是:
设置元素可命中false,如果看到元素失去交互,而且堆栈没有任何地方使用失去获得,那么可能就是存在设置元素可命中false。
如果有两个函数同时 获得 一个元素,会不会出现 失去获得?不会,如果同一个元素多次 获得,那么不会出现失去获得。如果这是让另一个获得,那么这个元素就是失去获得。可以通过元素.IsMouseCaptured 判断元素获得。
可以通过 Mouse.Captured 获得现在 Mouse 是否获得。如果返回是 null ,没有获得,但是元素获得存在一些问题,在失去焦点或其他,可能就失去获得。
CaptureMouse/CaptureStylus 可能会失败 - walterlv
反射引用程序集
这是比较难以说明的问题,总之,可能出现的问题就是引用了一个 xaml 使用的资源库,或使用了一个只有反射才访问的库。
原因: 如果在引用一个库,引用代码没有直接使用的程序集。使用的方法就是使用 xaml 或反射来使用。那么在生成,vs 不会把程序集放在输出文件夹。
问题: 反射报错,无法找到程序集。
例子: 如果我用了一个程序集,然而代码没有直接引用,而是反射使用,这样,vs判断这个程序集没有使用,最后把他清除。所以会出现反射无法拿到,而且很难知道这里出现坑。
为了解决 xaml 和反射无法拿到的坑,可以使用 在任意位置使用 Debug.Write(typeof(程序集里的一个类)) 方法让 vs 引用程序集。
那么在 Release 上为何还可以把程序集放在输出文件夹呢?因为我也不知道原因,如果你知道的话,那么请告诉我一下。
使用十进制设置颜色
在 xaml 如果需要使用 十进制设置颜色,请使用下面代码
<SolidColorBrush x:Key="LikeGreen"> <SolidColorBrush.Color> <Color R="100" G="200" B="30" A="100"/> </SolidColorBrush.Color> </SolidColorBrush>https://stackoverflow.com/a/47952098/6116637
WPF 判断文件是否隐藏
可以设置一些文件是隐藏文件,那么 WPF 如何判断 FileInfo 是隐藏文件?
简单的代码,通过判断 Attributes 就可以得到,请看下面。
file.Attributes.HasFlag(FileAttributes.Hidden)触发鼠标事件
触发鼠标点下事件,可以使用下面代码
element.RaiseEvent(new MouseEventArgs(Mouse.PrimaryDevice, 1) { RoutedEvent = Mouse.MouseDownEvent });TextBlock 换行
使用 就可以换行
win10 uwp 在 xaml 让 TextBlock 换行
在 xaml 绑定索引空格
如果一个索引需要传入空格,那么在 xaml 使用下面代码是无法绑定
{Binding MyCollection[foo bar]}需要使用下面代码
{Binding MyCollection[[foo&x20;bar]]}Binding to an index with space in XAML – Ivan Krivyakov
使用 Task ContinueWith 在主线程
在有时候使用 Task 的 Delay 之后想要返回主线程,可以使用 ContinueWith 的方法,请看代码
Task.Delay(TimeSpan.FromSeconds(5)).ContinueWith ( _ => Foo() // 如果 Foo 不需要在主线程,请注释下面一段代码 , TaskScheduler.FromCurrentSynchronizationContext() );核心是 TaskScheduler.FromCurrentSynchronizationContext 方法
如果 Foo 不需要在主线程,就可以删除 TaskScheduler.FromCurrentSynchronizationContext 代码
WPF-数据绑定:日期时间格式
{Binding datetime,StringFormat='{}{0:yyyy年MM月dd日 dddd HH:mm:ss}',ConverterCulture=zh-CN}指定ConverterCulture为zh-CN后星期就显示为中文了。
WPF 第三方DLL 强签名
参见:http://www.cnblogs.com/xjt927/p/5317678.html
WPF 去掉最大化按钮
通过在窗口添加下面代码
ResizeMode="NoResize"窗口就剩下一个关闭同时用户也无法拖动修改窗口大小
WPF TextBox 全选
在一个按钮点击的时候全选 TextBox 的内容,可以在按钮里面调用 SelectAll 方法
textBox.SelectAll();上面代码的 textBox 就是界面写的 TextBox 元素
如果发现调用上面的代码 TextBox 没有全选,可能是 TextBox 没有拿到焦点,可以尝试下面代码
textBox.Focus();textBox.SelectAll();WPF 获取文本光标宽度
通过 SystemParameters.CaretWidth 获取宽度
var caretWidth = SystemParameters.CaretWidth;将字符渲染为 Geometry 几何
可以通过 FormattedText 进行渲染
           var fontFamily = new FontFamily("宋体");           Typeface typeface = new Typeface(fontFamily, FontStyles.Normal, FontWeights.Normal, FontStretches.Normal);
           var formattedText = new FormattedText("林", CultureInfo.CurrentCulture, FlowDirection.LeftToRight, typeface, 20, Brushes.Black, new NumberSubstitution(), TextFormattingMode.Ideal, 96);           var geometry = formattedText.BuildGeometry(new Point());           Path.Data = geometry;
           // 如果要拆开的话的例子           if (geometry is GeometryGroup geometryGroup)           {               foreach (var geometryGroupChild in geometryGroup.Children)               {                   if (geometryGroupChild is GeometryGroup subGeometryGroup)                   {                       foreach (var child in subGeometryGroup.Children)                       {                           if (child is PathGeometry pathGeometry)                           {                               foreach (var pathGeometryFigure in pathGeometry.Figures)                               {                               }                           }                       }                   }               }           }
获取屏幕可用大小
SystemParameters.WorkArea设置另一个窗口获取焦点
设置窗口获取焦点不能通过 Focus 设置,这个方法设置的是窗口控件拿到窗口内焦点,需要通过 Activate 方法激活窗口
window.Activate();推荐在子窗口关闭之前激活 Owner 解决关闭模态窗口后,父窗口居然失去焦点跑到了其他窗口的后面的问题 - walterlv
详细请看 SystemParameters.CaretWidth Property
wpf动画——new PropertyPath属性链 - 影天 - 博客园
wpf动画——缓动动画Animation Easing - 影天 - 博客园
WPF ListView 使用 WrapPanel 没有自动换行
原因是没有设置禁用 ListView 的水平滚动
<ListView ScrollViewer.HorizontalScrollBarVisibility="Disabled"> <ListView.ItemsPanel> <ItemsPanelTemplate> <WrapPanel Orientation="Horizontal" /> </ItemsPanelTemplate> </ListView.ItemsPanel></ListView>WPF ListView 或 ListBox 压缩内容
让 ListView 或 ListBox 的 Item 项撑开宽度可以通过设置 ItemContainerStyle 配置,设置里层内容的 HorizontalAlignment 为 Stretch 即可。如以下代码
<ListBox> <ListBox.ItemContainerStyle> <Style TargetType="{x:Type ListBoxItem}"> <Setter Property="Template"> <Setter.Value> <ControlTemplate TargetType="{x:Type ListBoxItem}"> <Border x:Name="Border" HorizontalAlignment="Stretch" VerticalAlignment="Stretch" Margin="1" Height="200" CornerRadius="20"> </Border> </ControlTemplate> </Setter.Value> </Setter> </Style> </ListBox.ItemContainerStyle> </ListBox>禁用 ListView 或 ListBox 的 Tab 焦点虚框
默认在按下 Tab 时,将会给 ListView 或 ListBox 的 Item 添加上 FocusVisualStyle 对应的虚线矩形框
如果不想要看到这个虚线矩形框,可以通过设置 ItemContainerStyle 配置,设置 FocusVisualStyle 样式,如以下代码
<ListBox> <ListBox.ItemContainerStyle> <Style TargetType="{x:Type ListBoxItem}"> <Setter Property="FocusVisualStyle" Value="{x:Null}"></Setter> ... 忽略其他代码 </Style> </ListBox.ItemContainerStyle> </ListBox>详细请看 为控件中的焦点设置样式以及 FocusVisualStyle - WPF .NET Framework
通用路由事件定义
因为没有模版创建,还是写一下,方便抄代码
        public static readonly RoutedEvent LindexiEvent = EventManager.RegisterRoutedEvent("Lindexi",            RoutingStrategy.Bubble, typeof(EventHandler<LindexiRoutedEventArgs>), typeof(Owner));
        public event EventHandler<LindexiRoutedEventArgs> Lindexi        {            add { AddHandler(LindexiEvent, value); }            remove { RemoveHandler(LindexiEvent, value); }        }
全部代码
    public class Owner : UIElement    {        public static readonly RoutedEvent LindexiEvent = EventManager.RegisterRoutedEvent("Lindexi",            RoutingStrategy.Bubble, typeof(LindexiRoutedEventEventHandler), typeof(Owner));
        public event LindexiRoutedEventEventHandler Lindexi        {            add { AddHandler(LindexiEvent, value); }            remove { RemoveHandler(LindexiEvent, value); }        }
        public void RaiseLindexiEvent()        {            RaiseEvent(new LindexiRoutedEventArgs(LindexiEvent, this));        }    }
    public class LindexiRoutedEventArgs : RoutedEventArgs    {        /// <inheritdoc />        public LindexiRoutedEventArgs()        {        }
        /// <inheritdoc />        public LindexiRoutedEventArgs(RoutedEvent routedEvent) : base(routedEvent)        {        }
        /// <inheritdoc />        public LindexiRoutedEventArgs(RoutedEvent routedEvent, object source) : base(routedEvent, source)        {        }
        protected override void InvokeEventHandler(Delegate genericHandler, object genericTarget)        {            // 这个方法的重写是可选的,用途是为了提升性能            // 如无重写,底层将会调用 Delegate.DynamicInvoke 方法触发事件,这是通过反射的方法调用的            var handler = (LindexiRoutedEventEventHandler) genericHandler;            handler(genericTarget, this);        }    }
    public delegate void LindexiRoutedEventEventHandler(object sender,        LindexiRoutedEventArgs e);
监听
            xx.AddHandler(Owner.LindexiEvent, new LindexiRoutedEventEventHandler((o, args) =>            {
            }));
附加路由事件
路由事件可以定义在任意的类
    public static class LindexiExtensions    {        public static void AddLindexiHandler(UIElement element,            EventHandler<LindexiRoutedEventArgs> handler)        {            element.AddHandler(LindexiEvent, handler);        }
        public static void RemoveLindexiHandler(UIElement element,            EventHandler<LindexiRoutedEventArgs> handler)        {            element.RemoveHandler(LindexiEvent, handler);        }
        public static readonly RoutedEvent LindexiEvent =            EventManager.RegisterRoutedEvent("Lindexi",                RoutingStrategy.Bubble, typeof(EventHandler<LindexiRoutedEventArgs>),                typeof(LindexiExtensions));
        public static void RaiseLindexiEvent(UIElement element)        {            element.RaiseEvent(new LindexiRoutedEventArgs(LindexiEvent, element));        }    }
    public class LindexiRoutedEventArgs : RoutedEventArgs    {        public LindexiRoutedEventArgs(RoutedEvent routedEvent, object source) : base(routedEvent, source)        {        }
        protected override void InvokeEventHandler(Delegate genericHandler, object genericTarget)        {            // 这个方法的重写是可选的,用途是为了提升性能            // 如无重写,底层将会调用 Delegate.DynamicInvoke 方法触发事件,这是通过反射的方法调用的            var handler = (EventHandler<LindexiRoutedEventArgs>) genericHandler;            handler(genericTarget, this);        }    }
如使用 element.RaiseEvent(new UIElementDraggedRoutedEventArgs(UIElementDraggedEvent, element2)); 那么事件里面的 Source 是 element 而 OriginSource 是 element2 元素
滚动 ListView 的内容到最底
DependencyObject border = VisualTreeHelper.GetChild(ListView, 0); ScrollViewer scrollViewer = (ScrollViewer)VisualTreeHelper.GetChild(border, 0); scrollViewer.ScrollToBottom();可以使用下面扩展方法
public static class ListViewExtensions { public static void ScrollToBottom(this ListView listView) { DependencyObject border = VisualTreeHelper.GetChild(listView, 0); ScrollViewer scrollViewer = (ScrollViewer) VisualTreeHelper.GetChild(border, 0); scrollViewer.ScrollToBottom(); } }WPF ListBox Scroll to end automatically - Stack Overflow
WPF 截图功能的实现
        public static BitmapSource Snap(this FrameworkElement element, double scale, int desiredHeight, int desiredWidth)        {            var width = (int)(element.ActualWidth);            if (width == 0)            {                width = desiredWidth;            }
            var height = (int)(element.ActualHeight);            if (height == 0)            {                height = desiredHeight;            }
            if (!element.IsLoaded)            {                element.Arrange(new Rect(0, 0, width, height));                element.Measure(new Size(width, height));            }
            var scaleWidth = (int)(width * scale);            var scaleHeight = (int)(height * scale);
            var bitmap = new RenderTargetBitmap(scaleWidth, scaleHeight, 96.0, 96.0, PixelFormats.Pbgra32);            var rectangle = new Rectangle            {                Width = scaleWidth,                Height = scaleHeight,
                Fill = new VisualBrush(element)                {                    Viewbox = new Rect(0, 0, width, height),                    ViewboxUnits = BrushMappingMode.Absolute,                }            };
            rectangle.Measure(new Size(scaleWidth, scaleHeight));            rectangle.Arrange(new Rect(new Size(scaleWidth, scaleHeight)));
            bitmap.Render(rectangle);            return bitmap;        }
详细请看 WPF 截图功能的实现
WPF 使用 Frame 导航 缓存之前页面实例
默认 Frame 导航不会保存 Page 对象,想要实现 Cache 页面的功能,导航的时候调用原来的实例不重新创建,需要在页面设置 KeepAlive=true 属性。这个设置相当于在 UWP 中的 Page.NavigationCacheMode Property 属性
private void Foo(Page p){ p.KeepAlive = true;}或在 XAML 使用下面代码
<Page xmlns="http://schemas.microsoft.com/winfx/2006/xaml/presentation" xmlns:x="http://schemas.microsoft.com/winfx/2006/xaml" WindowTitle="WillBeKeptInMemory" KeepAlive="True">c# - How are WPF pages held in memory? - Stack Overflow
WPF 获得依赖属性值更新
如果需要获得 G 的 Padding 的值更改,WPF 获得依赖属性 值更改可以使用下面代码
DependencyPropertyDescriptor.FromProperty(Border.PaddingProperty, typeof(Border)).AddValueChanged(Board, (s, e) => { Padding = Board.Padding; BoardPadding = Board.Padding; });这个方法就是获得属性的值更改
但是这个方法会出现内存泄露,可以使用 RemoveValueChanged 清除,为了使用清除,需要写一个函数。不需要担心清除一个不存在的委托函数,一般在使用 AddValueChanged 之前都使用 RemoveValueChanged 清除,如此即可减少重复调用 AddValueChanged 导致多次监听以及内存泄露问题
参见:https://stackoverflow.com/questions/4764916/listen-to-changes-of-dependency-property
这个方法是针对于对象之外的,监听某个对象的依赖属性变更。如果是在一个自己可以更改代码的类型里面的对象,可以通过重写 OnPropertyChanged 获取到依赖属性变更,如以下代码
public partial class Foo : FrameworkElement{ protected override void OnPropertyChanged(DependencyPropertyChangedEventArgs e) { if (e.Property == FrameworkElement.WidthProperty) { } }}依赖属性变更时,将会进入到 OnPropertyChanged 方法
WPF 如何正确的在tooltip中实现绑定
解决 ToolTip 绑定不上的问题
2020-1-8-如何正确的在tooltip中实现绑定 - huangtengxiao
WPF 拖动元素
代码放在 github 欢迎小伙伴访问
依赖属性的 FrameworkPropertyMetadata 配置仅在 FrameworkElement 生效
如果一个自定义的类型只是继承 UIElement 类型,那么在依赖属性定义的 FrameworkPropertyMetadata 里面设置的 FrameworkPropertyMetadataOptions.AffectsRender 等都是无效的,如下面代码
public class Doubi : UIElement{        public static readonly DependencyProperty LindexiProperty = DependencyProperty.Register(            "Lindexi", typeof(Lindexi), typeof(Doubi), new FrameworkPropertyMetadata(default(Lindexi), FrameworkPropertyMetadataOptions.AffectsRender));
        public Lindexi Lindexi        {            get { return (Lindexi) GetValue(LindexiProperty); }            set { SetValue(LindexiProperty, value); }        }}
如果更改 Lindexi 属性的值,是不会重新触发 OnRender 函数的,因为 FrameworkPropertyMetadataOptions.AffectsRender 的设置是在 FrameworkPropertyMetadata 里面,而这个类需要在 FrameworkElement 下生效,只是继承 UIElement 是无效的
多个依赖属性共用一个 PropertyMetadata 对象
如果我定义了多个依赖属性,这些属性都有相同的 PropertyMetadata 定义,如下面代码
    class Doubi : UIElement    {        public static readonly DependencyProperty F1Property = DependencyProperty.Register(            "F1", typeof(Lindexi), typeof(Doubi), new PropertyMetadata(default(Lindexi)));
        public Lindexi F1        {            get { return (Lindexi) GetValue(F1Property); }            set { SetValue(F1Property, value); }        }
        public static readonly DependencyProperty F2Property = DependencyProperty.Register(            "F2", typeof(double), typeof(Doubi), new PropertyMetadata(default(double)));
        public double F2        {            get { return (double) GetValue(F2Property); }            set { SetValue(F2Property, value); }        }    }
    class Lindexi    {
    }
可以看到 F1Property 和 F2Property 的 PropertyMetadata 里面的定义都是相同的,那么我是否可以只定义一个对象,如下面代码
        private static readonly PropertyMetadata DefaultPropertyMetadata = new PropertyMetadata(default(Lindexi));
        public static readonly DependencyProperty F1Property = DependencyProperty.Register(            "F1", typeof(Lindexi), typeof(Doubi), DefaultPropertyMetadata);
        public Lindexi F1        {            get { return (Lindexi) GetValue(F1Property); }            set { SetValue(F1Property, value); }        }
        public static readonly DependencyProperty F2Property = DependencyProperty.Register(            "F2", typeof(double), typeof(Doubi), DefaultPropertyMetadata);
        public double F2        {            get { return (double) GetValue(F2Property); }            set { SetValue(F2Property, value); }        }
这是不可以的,此时运行将会提示此元数据已与类型和属性关联。必须新建一个元数据
System.ArgumentException:“此元数据已与类型和属性关联。必须新建一个元数据。”抛出的堆栈如下
WindowsBase.dll!System.Windows.DependencyProperty.SetupOverrideMetadata(System.Type, System.Windows.PropertyMetadata typeMetadata, out System.Windows.DependencyObjectType dType, out System.Windows.PropertyMetadata baseMetadata) 未知 WindowsBase.dll!System.Windows.DependencyProperty.OverrideMetadata(System.Type, System.Windows.PropertyMetadata typeMetadata = {System.Windows.PropertyMetadata}) 未知 WindowsBase.dll!System.Windows.DependencyProperty.Register(string name, System.Type propertyType, System.Type ownerType, System.Windows.PropertyMetadata typeMetadata, System.Windows.ValidateValueCallback validateValueCallback) 未知 WindowsBase.dll!System.Windows.DependencyProperty.Register(string name, System.Type propertyType, System.Type ownerType, System.Windows.PropertyMetadata typeMetadata) 未知选择 ListView 的某一项同时滚动到某一项
在 WPF 中让 ListView 滚动到选择的一项,可以在知道当前选择的是哪一项之后,通过如下代码设置。下面代码的 InkPointListView 是一个 ListView 元素,而 selectedIndex 表示当前选择的项的序号,可以使用下面代码,设置自动滚动
            InkPointListView.SelectedIndex = selectedIndex;
            if (selectedIndex >= 0 && selectedIndex < InkPointListView.Items.Count)            {                InkPointListView.ScrollIntoView(InkPointListView.Items[selectedIndex]);            }
绑定无视 CLR 属性的返回值
如下面代码,返回的是字符串常量,但实际的绑定是有效的
        public static readonly DependencyProperty TextProperty = DependencyProperty.Register(            "Text", typeof(string), typeof(TextControl));
        public string Text        {            get { return "lindexi is doubi"; }            set { SetValue(TextProperty, value); }        }
绑定返回值是绑定的值,而不是返回的字符串
<StackPanel> <TextBlock x:Name="TextBlock" Margin="10,10,10,10" Text="123"></TextBlock> <local:TextControl Margin="10,10,10,10" Text="{Binding ElementName=TextBlock,Path=Text}"></local:TextControl> </StackPanel>单元测试没有 GetEntryAssembly 的返回值
在单元测试调用 Assembly.GetEntryAssembly() 拿到的返回值是空
    /// <summary>    /// Use as first line in ad hoc tests (needed by XNA specifically)    /// </summary>    public static void SetEntryAssembly()    {        SetEntryAssembly(Assembly.GetCallingAssembly());    }
    /// <summary>    /// Allows setting the Entry Assembly when needed.    /// Use AssemblyUtilities.SetEntryAssembly() as first line in XNA ad hoc tests    /// </summary>    /// <param name="assembly">Assembly to set as entry assembly</param>    public static void SetEntryAssembly(Assembly assembly)    {        AppDomainManager manager = new AppDomainManager();        FieldInfo entryAssemblyField = manager.GetType().GetField("m_entryAssembly", BindingFlags.Instance | BindingFlags.NonPublic);        entryAssemblyField.SetValue(manager, assembly);
        AppDomain domain = AppDomain.CurrentDomain;        FieldInfo domainManagerField = domain.GetType().GetField("_domainManager", BindingFlags.Instance | BindingFlags.NonPublic);        domainManagerField.SetValue(domain, manager);    }
触发 WPF 按钮点击
ButtonAutomationPeer peer = new ButtonAutomationPeer(someButton);IInvokeProvider invokeProv = peer.GetPattern(PatternInterface.Invoke) as IInvokeProvider;invokeProv.Invoke();详细请看 https://stackoverflow.com/a/728444/6116637 和 【WPF】代码触发Button点击事件 - 霍莉雪特 - 博客园
EventTrigger
有哪些内置的,有哪些可用的
EventTrigger原理浅谈 - huangtengxiao
自定义控件的布局时机和尺寸
在 Grid 里面,设置自定义控件如下
<Grid Width="300" Height="250">HorizontalAlignment="Left" VerticalAlignment="Top"进入测量方法时给的是 Grid 的大小
protected override Size MeasureOverride(Size availableSize) { // availableSize = {300, 250} }根据返回值的不同,进入 ArrangeOverride 的值也不同。如返回宽度和高度都小于传入的尺寸
protected override Size MeasureOverride(Size availableSize) { return new Size(10, 10); }以上代码在进入 ArrangeOverride 时传入的参数就是 MeasureOverride 返回的值
protected override Size ArrangeOverride(Size finalSize) { // finalSize = {10,10} return base.ArrangeOverride(finalSize); }返回值如果超过了宽度高度,如下面代码,此时进入 ArrangeOverride 传入的参数也是 MeasureOverride 返回的值
        protected override Size MeasureOverride(Size availableSize)        {            return new Size(5000, 10);        }
        protected override Size ArrangeOverride(Size finalSize)        {            // finalSize = {5000,10}            return base.ArrangeOverride(finalSize);        }
如果控件在 Grid 的设置如下
HorizontalAlignment="Left" VerticalAlignment="Stretch"如果返回的参数是小于 Grid 容器大小的,按照顺序调用进入下面代码和参数分别如下
        protected override Size MeasureOverride(Size availableSize)        {            // {300,250}            return new Size(10, 10);        }
        protected override Size ArrangeOverride(Size finalSize)        {            // {10,250}            return base.ArrangeOverride(finalSize);        }
如果返回的参数是大于 Grid 容器大小的,按照顺序调用进入下面代码和参数分别如下
        protected override Size MeasureOverride(Size availableSize)        {            // {300,250}            return new Size(1000, 2000);        }
        protected override Size ArrangeOverride(Size finalSize)        {            // {1000,2000}            return base.ArrangeOverride(finalSize);        }
放在 StackPanel 的,如下面容器定义
<StackPanel Width="300" Height="250"> </StackPanel>给定的参数如下,对于竖排的 StackPanel 取决于 MeasureOverride 返回的垂直的值,而无视宽度的值
        protected override Size MeasureOverride(Size availableSize)        {            // {300,∞}            return new Size(10, 10);        }
        protected override Size ArrangeOverride(Size finalSize)        {            // {300,10}            return base.ArrangeOverride(finalSize);        }
总体规则是 MeasureOverride 进入时,传入 StackPanel.Width 和 ∞ 的高度。进入 ArrangeOverride 时,传入 Math.Max(StackPanel.Width, MeasureOverride.Size.Width) 宽度和 MeasureOverride.Size.Height 高度
        protected override Size MeasureOverride(Size availableSize)        {            // {300,∞}            return new Size(600, 1000);        }
        protected override Size ArrangeOverride(Size finalSize)        {            // {600,1000}            return base.ArrangeOverride(finalSize);        }
放在 Canvas 里面,测量传入都是无穷,布局传入的就是测量返回的值
自定义控件的 OnRender 没有被触发
如果是继承 UIElement 的自定义控件,此控件重写的 OnRender 方法没有被触发。原因是上层的控件没有调用此控件的 Arrange 布局方法
自定义控件的 OnRender 触发但是没有界面可见
如果上层的自定义控件没有重写 VisualCount 和 GetChildVisual 方法,返回里层的控件,那么里层控件在 OnRender 渲染的内容不会显示到界面上
上层元素调用 AddVisualChild 方法是让里层元素建立视觉树关系,建立视觉树关系不意味着可以被渲染,只是提供了让里层元素可以被交互的功能。只有在 GetVisualChild 里面返回了里层控件,才可以让里层控件在界面上渲染出来
因此如果发现自定义控件没有界面渲染出来,请先在 OnRender 打上断点,如果断点没有进入,查看是否上层控件有调用里层控件的 Arrange 布局方法。如果断点进入还没有界面,请找上层控件是否有重写 GetVisualChild 和 VisualChildrenCount 方法,同时上层控件需要在 GetVisualChild 有返回里层控件
定制 TextBox 的光标
实现方法就是使用 Transparent 设置原本的 WPF 的光标,让原本 WPF 的 TextBox 的光标不可见。然后再新建一个 Border 元素,使用 Border 元素作为元素的显示光标。在每次 TextBox 的光标更新坐标的时候,修改 Border 所在容器的坐标,例子如下
界面如下
<Grid> <TextBox x:Name="TextBox" CaretBrush="Transparent" /> <Canvas> <Border x:Name="CaretBorder" Visibility="Collapsed" Canvas.Left="0" Canvas.Top="0" Width="2" Height="15"> <Border.Background> <LinearGradientBrush MappingMode="RelativeToBoundingBox" StartPoint="0,0" EndPoint="0,1"> <LinearGradientBrush.GradientStops> <GradientStop Color="Blue" Offset="0" /> <GradientStop Color="Magenta" Offset="0.5" /> <GradientStop Color="Green" Offset="1" /> </LinearGradientBrush.GradientStops> </LinearGradientBrush> </Border.Background> </Border> </Canvas> </Grid>后台代码如下
    private void MainWindow_Loaded(object sender, RoutedEventArgs e)    {        TextBox.SelectionChanged += (sender, e) => MoveCustomCaret((TextBox)sender);        TextBox.LostFocus += (sender, e) => CaretBorder.Visibility = Visibility.Collapsed;        TextBox.GotFocus += (sender, e) => CaretBorder.Visibility = Visibility.Visible;    }
    private void MoveCustomCaret(TextBox textBox)    {        var caretLocation = textBox.GetRectFromCharacterIndex(textBox.CaretIndex).Location;
        if (!double.IsInfinity(caretLocation.X))        {            Canvas.SetLeft(CaretBorder, caretLocation.X);        }
        if (!double.IsInfinity(caretLocation.Y))        {            Canvas.SetTop(CaretBorder, caretLocation.Y);        }    }
使用以上方法可以定制 WPF 的 TextBox 的光标的宽度高度,任意修改光标画刷,或者让元素跟随 TextBox 的光标坐标
隐藏原有 WPF 光标的方法就是设置 CaretBrush 为透明
发送键盘消息
发送给当前应用的键盘输入
        /// <summary>        ///   Sends the specified key.        /// </summary>        public static void SendKey(Key key)        {            SendKeyDown(key);            SendKeyUp(key);        }
        /// <summary>        ///   Sends the specified key.        /// </summary>        /// Form: https://stackoverflow.com/a/21074234/6116637        /// <param name="key">The key.</param>        public static void SendKeyDown(Key key)        {            if (Keyboard.PrimaryDevice != null)            {                if (Keyboard.PrimaryDevice.ActiveSource != null)                {                    var e = new KeyEventArgs(Keyboard.PrimaryDevice, Keyboard.PrimaryDevice.ActiveSource, 0, key)                    {                        RoutedEvent = Keyboard.KeyDownEvent                    };                    InputManager.Current.ProcessInput(e);                }            }        }
        /// <summary>        ///   Sends the specified key.        /// </summary>        /// Form: https://stackoverflow.com/a/21074234/6116637        public static void SendKeyUp(Key key)        {            if (Keyboard.PrimaryDevice != null)            {                if (Keyboard.PrimaryDevice.ActiveSource != null)                {                    var e = new KeyEventArgs(Keyboard.PrimaryDevice, Keyboard.PrimaryDevice.ActiveSource, 0, key)                    {                        RoutedEvent = Keyboard.KeyUpEvent                    };                    InputManager.Current.ProcessInput(e);                }            }        }
发送鼠标滚轮消息
var mouseWheelEventArgs = new MouseWheelEventArgs(InputManager.Current.PrimaryMouseDevice, Environment.TickCount, -120); mouseWheelEventArgs.RoutedEvent = UIElement.MouseWheelEvent; board.RaiseEvent(mouseWheelEventArgs);Win32Exception
默认不传入 Win32 异常的错误码,将会自动去获取 GetLastWin32Error 的值
以下是 Win32Exception 的代码
public Win32Exception() : this(Marshal.GetLastWin32Error()) { }如下面例子
            HandleRef h = new HandleRef(null, new IntPtr(5));
            var dc = IntGetDC(h);            if (dc == IntPtr.Zero)            {                var lastWin32Error = Marshal.GetLastWin32Error();
                var e = new Win32Exception();
                Console.WriteLine(e.NativeErrorCode == lastWin32Error);            }
[DllImport("user32.dll", SetLastError = true, ExactSpelling = true, EntryPoint = "GetDC", CharSet = CharSet.Auto)] private static extern IntPtr IntGetDC(HandleRef hWnd);MediaPlayer 不支持使用 pack 的链接
在 MediaPlayer 的 Open 传入的 Uri 是程序集资源,如 new Uri("pack://application:,,,/KufayunurharnaLuragaruker;component/Video.mp4") 的链接,在播放 Open 之后的下一次 Dispatcher 将会触发 MediaFailed 事件,提示失败
也就是说不会在调用 Open 方法之后,立刻触发 MediaFailed 事件。而是等待当前的 Dispatcher Frame 执行完成之后,下一个 Dispatcher 主线程触发事件
鼠标横向滚轮 水平滚轮 触控板横向移动
        /// <summary>        /// 监听窗口消息以处理横向滚轮/触控板横向移动的消息。        /// </summary>        private IntPtr Hook(IntPtr hwnd, int msg, IntPtr wParam, IntPtr lParam, ref bool handled)        {            const int WM_MOUSEHWHEEL = 0x020E;            switch (msg)            {                case WM_MOUSEHWHEEL:                    int tilt = (short)HIWORD(wParam);                    OnMouseTilt(tilt);                    return (IntPtr)1;            }
            return IntPtr.Zero;        }
        /// <summary>        /// 取指针所在高位数值。        /// </summary>        private static int HIWORD(IntPtr ptr)        {            var val32 = ptr.ToInt32();            return ((val32 >> 16) & 0xFFFF);        }
        /// <summary>        /// 鼠标横向滚轮触发时,横向滚动。        /// </summary>        /// <param name="tilt">横向滚动量,类似于竖向滚动里的 delta。</param>        private void OnMouseTilt(int tilt)        {        }
https://github.com/dotnet/wpf/issues/5937#issuecomment-1010510114
监听触摸频率
可采用 Touch.FrameReported 事件获取
如何知道 TouchLeave 是否因为 TouchUp 引起的
可通过判断 TouchPoint.Action 判断是否为 TouchAction.Up 了解当前的 TouchLeave 是否由 TouchUp 触发
var touchAction = e.GetTouchPoint(this).Action; if (touchAction == TouchAction.Up) { // 由于抬起的原因,那就不能算进离开窗口 return; }Helix 3d 加载资源
可以采用对应的 Reader 加载,详细请看 HelixBiyawubiburwhoKaiwunaikarwheqar 项目
绑定 CommandBindings 的命令没有触发
由于 CommandBindings 需要和 InputBindings 成对使用。先看元素的 KeyDown 能否触发,能触发的前提下,看是否忘记加了 InputBindings 绑定
_textArea.CommandBindings.Add(new CommandBinding(EditingCommands.Backspace, OnBackspace)); _textArea.InputBindings.Add(new KeyBinding(EditingCommands.Backspace, Key.Back, ModifierKeys.None));WPF 行为
设置 DrawingGroup 进行 Freeze 之后设置 Transform 属性
设置 DrawingGroup 进行 Freeze 之后设置 Transform 属性将会抛出异常
System.InvalidOperationException:“无法在对象“System.Windows.Media.DrawingGroup”上设置属性,因为它处于只读状态。”代码如下
DrawingGroup drawingGroup = Draw();drawingGroup.Freeze();drawingGroup.Transform = translateTransform;解决方法是替换漫游的方式,替换的方式是通过 DrawingContext 的 PushTransform 方法修改
默认的 WindowStyle 类型是什么
默认的 WindowStyle 是 SingleBorderWindow 类型的枚举
隐藏窗口再调用 Maximized 属性
如下代码
private async void MainWindow_Loaded(object sender, RoutedEventArgs e) { await Task.Delay(2000); Hide(); await Task.Delay(2000); WindowState = WindowState.Maximized; await Task.Delay(1000); Show(); }可以看到窗口调用 Hide 之后,调用 WindowState = WindowState.Maximized; 是没有效果的,窗口没有出现也没有最大化。等待调用 Show 方法的时候,将会显示窗口,窗口是最大化
获取 ContextMenu 附加关联的控件
取 ContextMenu 的 PlacementTarget 属性。如附加到 Grid 上的 ContextMenu 在右击时,尝试获取到 Grid 控件,可使用如下代码
    private void MenuItem_OnClick(object sender, RoutedEventArgs e)    {        var menuItem = (MenuItem) sender;
        DependencyObject t = menuItem;        while (t != null)        {            t = LogicalTreeHelper.GetParent(t);
            if (t is ContextMenu)            {                break;            }        }
        var c = t as ContextMenu;        var placementTarget = c?.PlacementTarget as Grid;    }
界面 XAML 代码如下
    <Grid Background="Transparent">
        <Grid.ContextMenu>            <ContextMenu>                <MenuItem Click="MenuItem_OnClick"></MenuItem>            </ContextMenu>        </Grid.ContextMenu>    </Grid>
默认字体
中文环境的默认字体是主题带的,这里比较有吐槽点,详细请看 The default font family of Chinese characters in a WPF app in non-zh-CN region is Segoe UI instead of Microsoft YaHei UI · Issue #6164 · dotnet/wpf
在 Winforms 里面,默认的 System.Windows.Forms.Control.DefaultFont.Name 将使用 System.Drawing.SystemFonts.MenuFont?.Name 字体。对应在 WPF 里面,可以使用 SystemFonts.MessageFontFamily 属性提供的字体

原文链接: http://blog.lindexi.com/post/WPF-%E5%BC%80%E5%8F%91
本作品采用 知识共享署名-非商业性使用-相同方式共享 4.0 国际许可协议 进行许可。 欢迎转载、使用、重新发布,但务必保留文章署名 林德熙 (包含链接: https://blog.lindexi.com ),不得用于商业目的,基于本文修改后的作品务必以相同的许可发布。如有任何疑问,请与我 联系。