我在寻找将一些拍摄出来的比较暗的图片进行光亮增强的算法,用于处理我出门拍的一些照片。我从博客园找到了 Imageshop 大佬记录的伊拉克团队的TAGC(低光增强效果)算法实现,通过阅读大佬的博客和对应的论文,基于 WPF 的 WriteableBitmap 实现 TAGC 低光增强效果算法
开始之前,必须感谢 只(挚)爱图像处理 - Imageshop 大佬的分享。本文将参阅 伊拉克团队的TAGC(低光增强效果)算法实现。 - Imageshop - 博客园 进行实现
原论文信息如下:
论文标题: Tuning adaptive gamma correction (TAGC) for enhancing images in low light
发表日期: 2025年07月
作者: Ghufran Alhamzawi, Alfoudi Ali Saeed, Suha Mohammed Hadi等
发表单位: University of Al-Qadisiyah, University of Information Technology and Communications等
原文链接: http://arxiv.org/pdf/2507.19574v1
实现效果如下图所示
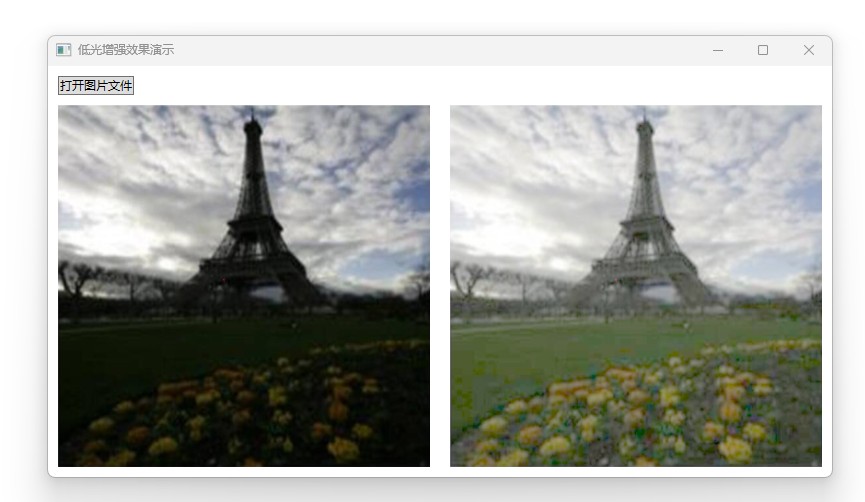
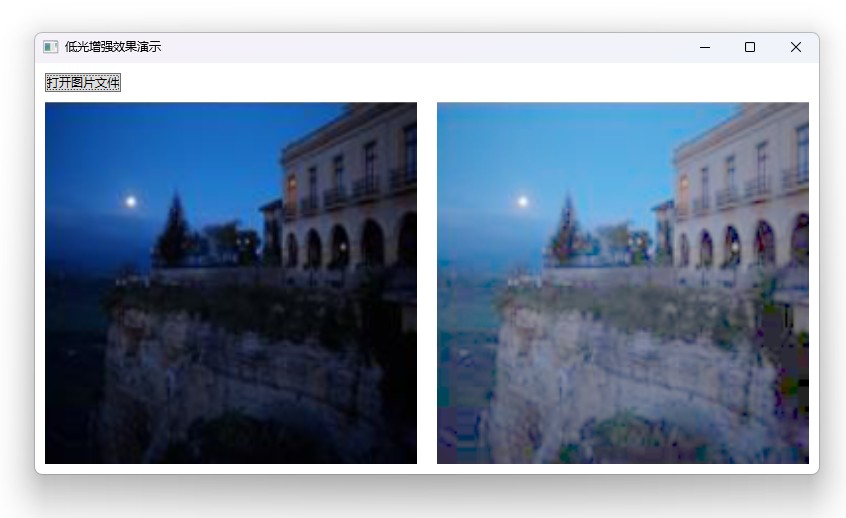
这个过程无需玄学算法参与,无需对接任何 AI 相关的算法,仅仅只是非常简单的逐个像素进行数学计算。核心实现代码如下
/// <summary>/// Tuning adaptive gamma correction (TAGC) 低光增强效果算法/// </summary>public class TuningAdaptiveGammaCorrectionAlgorithm{ public static unsafe void Enhancement(WriteableBitmap sourceBitmap, WriteableBitmap targetBitmap) { if (sourceBitmap.Format != targetBitmap.Format) { return; }
if (sourceBitmap.Format != PixelFormats.Bgra32) { return; }
float inv255 = 1.0f / 255;
sourceBitmap.Lock(); targetBitmap.Lock();
byte* src = (byte*)sourceBitmap.BackBuffer; byte* dest = (byte*)targetBitmap.BackBuffer;
var height = sourceBitmap.PixelHeight; var width = sourceBitmap.PixelWidth; var stride = sourceBitmap.BackBufferStride; int channel = stride / width;
for (int yIndex = 0; yIndex < height; yIndex++) { byte* linePixelSource = src + yIndex * stride; byte* linePixelDest = dest + yIndex * stride; for (int xIndex = 0; xIndex < width; xIndex++) { float blue = linePixelSource[0] * inv255; float green = linePixelSource[1] * inv255; float red = linePixelSource[2] * inv255; double l = 0.2126f * red + 0.7152 * green + 0.0722 * blue; float a = (blue + green + red) / 3; double gamma = 5.0f + (0.5f - l) * (1 - a) - 2 * l; double y = 2 / gamma;
byte tb = ClampToByte((int)(Math.Pow(blue, y) * 255 + 0.4999999f)); double y1 = 2 / gamma; byte tg = ClampToByte((int)(Math.Pow(green, y1) * 255 + 0.4999999f)); double y2 = 2 / gamma; byte tr = ClampToByte((int)(Math.Pow(red, y2) * 255 + 0.4999999f));
byte ta = 0xFF;
linePixelDest[0] = tb; linePixelDest[1] = tg; linePixelDest[2] = tr; linePixelDest[3] = ta;
linePixelSource += channel; linePixelDest += channel; } }
targetBitmap.AddDirtyRect(new Int32Rect(0, 0, targetBitmap.PixelWidth, targetBitmap.PixelHeight)); sourceBitmap.Unlock(); targetBitmap.Unlock(); }
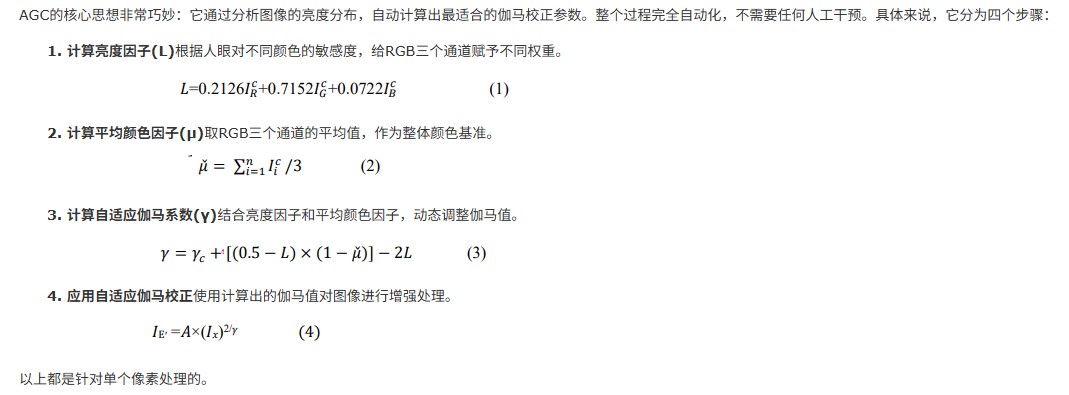
private static byte ClampToByte(int value) { return (byte)Math.Clamp(value, 0, byte.MaxValue); }}具体计算的原理,如 https://www.cnblogs.com/Imageshop/p/19025343 博客内容所述:
使用 Tuning adaptive gamma correction (TAGC) 确实能够帮我将很多拍摄暗光照片进行低光增强。但对于一些屏幕截图的效果或其他非拍摄的图片的处理效果不佳
整个算法代码看起来也比较清新,代码量也少,能够实现如此好的效果,也是需要给大佬们点赞。如果大家对此算法效果感兴趣,欢迎按照本文末尾的方法拉取我的代码跑跑看效果,或直接从 Imageshop 大佬那下载他已经构建好的程序
细心的伙伴也许看到了,在本文的 Enhancement 方法里面需要判断图片的格式,但并非所有的图片都能遵循此格式。好在 WPF 里面可以非常方便地通过 FormatConvertedBitmap 进行转换,此转换过程都是利用 WIC 多媒体进行转换,性能非常高,损耗非常低。核心代码如下
var formatConvertedBitmap = new FormatConvertedBitmap(); formatConvertedBitmap.BeginInit(); formatConvertedBitmap.Source = source; formatConvertedBitmap.DestinationFormat = PixelFormats.Bgra32; formatConvertedBitmap.EndInit();使用的时候直接将 FormatConvertedBitmap 当成 BitmapSource 传递就可以了。完全的从传入的图片文件路径,经过 TAGC 算法,将输出的 WriteableBitmap 给到 DestImage 控件的 Source 的代码如下
    private void Enhancement(string filePath)    {        if (string.IsNullOrEmpty(filePath) || !File.Exists(filePath))        {            return;        }
        filePath = Path.GetFullPath(filePath);
        var source = new BitmapImage(new Uri(filePath));        SourceImage.Source = source;
        var formatConvertedBitmap = new FormatConvertedBitmap();        formatConvertedBitmap.BeginInit();        formatConvertedBitmap.Source = source;        formatConvertedBitmap.DestinationFormat = PixelFormats.Bgra32;        formatConvertedBitmap.EndInit();
        var sourceBitmap = new WriteableBitmap(formatConvertedBitmap);        var targetBitmap = new WriteableBitmap(sourceBitmap.PixelWidth, sourceBitmap.PixelHeight, sourceBitmap.DpiX,            sourceBitmap.DpiY, sourceBitmap.Format, sourceBitmap.Palette);
        TuningAdaptiveGammaCorrectionAlgorithm.Enhancement(sourceBitmap, targetBitmap);
        var pngBitmapEncoder = new PngBitmapEncoder();        pngBitmapEncoder.Frames.Add(BitmapFrame.Create(targetBitmap));        using var stream = File.Create("1.png");        pngBitmapEncoder.Save(stream);
        DestImage.Source = targetBitmap;    }
以上的 DestImage 就是 Image 控件,界面代码定义如下
<Grid RowDefinitions="Auto,*"> <Grid> <StackPanel Orientation="Horizontal"> <Button x:Name="OpenImageFileButton" Margin="10,10,10,0" Content="打开图片文件" Click="OpenImageFileButton_OnClick"/> </StackPanel> </Grid> <Grid Grid.Row="1" ColumnDefinitions="*,*"> <Image x:Name="SourceImage" Stretch="Fill" Margin="10,10,10,10"/> <Image x:Name="DestImage" Grid.Column="1" Stretch="Fill" Margin="10,10,10,10"/> </Grid> </Grid>按钮点击打开文件,其方法实现如下
private void OpenImageFileButton_OnClick(object sender, RoutedEventArgs e) { var openFileDialog = new OpenFileDialog() { Filter = "Image Files|*.jpg;*.jpeg;*.png;*.bmp;", Multiselect = false, }; openFileDialog.ShowDialog(this); var file = openFileDialog.FileName; Enhancement(file); }本文代码放在 github 和 gitee 上,可以使用如下命令行拉取代码。我整个代码仓库比较庞大,使用以下命令行可以进行部分拉取,拉取速度比较快
先创建一个空文件夹,接着使用命令行 cd 命令进入此空文件夹,在命令行里面输入以下代码,即可获取到本文的代码
git initgit remote add origin https://gitee.com/lindexi/lindexi_gd.gitgit pull origin 13152fb73b02bc3ec1acaca8c34ee44761fdff2c以上使用的是国内的 gitee 的源,如果 gitee 不能访问,请替换为 github 的源。请在命令行继续输入以下代码,将 gitee 源换成 github 源进行拉取代码。如果依然拉取不到代码,可以发邮件向我要代码
git remote remove origingit remote add origin https://github.com/lindexi/lindexi_gd.gitgit pull origin 13152fb73b02bc3ec1acaca8c34ee44761fdff2c获取代码之后,进入 WPFDemo/JoyojabujeaCocherallli 文件夹,即可获取到源代码
更多技术博客,请参阅 博客导航

本作品采用 知识共享署名-非商业性使用-相同方式共享 4.0 国际许可协议 进行许可。 欢迎转载、使用、重新发布,但务必保留文章署名 林德熙 (包含链接: https://blog.lindexi.com ),不得用于商业目的,基于本文修改后的作品务必以相同的许可发布。如有任何疑问,请与我 联系。