本文将使用 Path 画一个聊天气泡。
内容是看到 大神写的 WPF绘制简单常用的Path,想到 UWP 画图是不是也一样,于是做的一个抄袭的 Path
直接使用图片
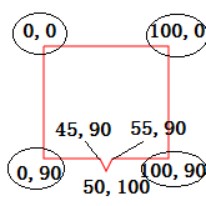
我们写上所有点。写在折线,在UWP,还是存在和 WPF 做法有些修改,却没有修改什么。
<Path Stroke="Black" StrokeThickness="2" Margin="10,10,10,10"> <Path.Data> <PathGeometry> <PathGeometry.Figures> <PathFigure> <PolyLineSegment Points="0,0 100,0 100,90 55,90 50,100 45,90 0,90 0,0"></PolyLineSegment> </PathFigure> </PathGeometry.Figures> </PathGeometry> </Path.Data> </Path>其实,可以不加PathGeometry.Figures ,看起来就和之前代码一样

下面就使用 ArcSegment 看起来不是尖角

<Path Stroke="Black" StrokeThickness="2" Margin="200,10,10,10"> <Path.Data> <PathGeometry> <PathGeometry.Figures> <PathFigure StartPoint="0,5"> <LineSegment Point="0,85"></LineSegment> <ArcSegment Point="5,90" Size="5,5"></ArcSegment> <LineSegment Point="45,90"></LineSegment> <LineSegment Point="50 100"></LineSegment> <LineSegment Point="55,90"></LineSegment> <LineSegment Point="95,90"></LineSegment> <ArcSegment Point="100,85" Size="5,5"></ArcSegment> <LineSegment Point="100,5"></LineSegment> <ArcSegment Point="95,0" Size="5,5" ></ArcSegment> <LineSegment Point="5,0"></LineSegment> <ArcSegment Point="0,5" Size="5,5"></ArcSegment> </PathFigure> </PathGeometry.Figures> </PathGeometry> </Path.Data> </Path>如果我们把第一个图,边框变大,可以看到没有合,这样觉得不好

可以设置 PathFigure IsClosed="True" 让最后一个点合在开始,这样就是闭合,不会出现没有合
我们来说下 ArcSegment
http://www.cnblogs.com/tsliwei/p/5609035.html
http://www.cnblogs.com/xpvincent/p/3830108.html

原文链接: http://blog.lindexi.com/post/win10-UWP-%E7%94%A8Path%E7%94%BB%E5%9B%BE
本作品采用 知识共享署名-非商业性使用-相同方式共享 4.0 国际许可协议 进行许可。 欢迎转载、使用、重新发布,但务必保留文章署名 林德熙 (包含链接: https://blog.lindexi.com ),不得用于商业目的,基于本文修改后的作品务必以相同的许可发布。如有任何疑问,请与我 联系。